
It appears that we have a weasel problem. Over the span of a week, we’ve lost 6 of our hens. It started with our oldest girl, Big Brown, then moved onto the two sexlinks, then 4 ISA Browns, one of which I had to dispatch because she’d been eviscerated, but left mostly alive.
Truth be told, dispatching her was tough. But it needed to be done.
Then started the research: what kind of predator would do this? It had to be small, because the coop and run are battened down tight enough to keep out skunks, coons and foxes. The consensus at the Maine Poultry Connection (fantastic bunch of people there) is that we have a weasel.
With the potential target identified, time now to research the best way to get rid of them. Yes, I understand that weasels are great at controlling the mouse population, but they are hell on chickens. My answer: a weasel box.
I found some online, price ranged from $9 to $35, but it is literally a wooden box, with a few other things added. I came up with a quick plan of my own (based on other plans and ideas that I found online), and I thought that I would share it with you.
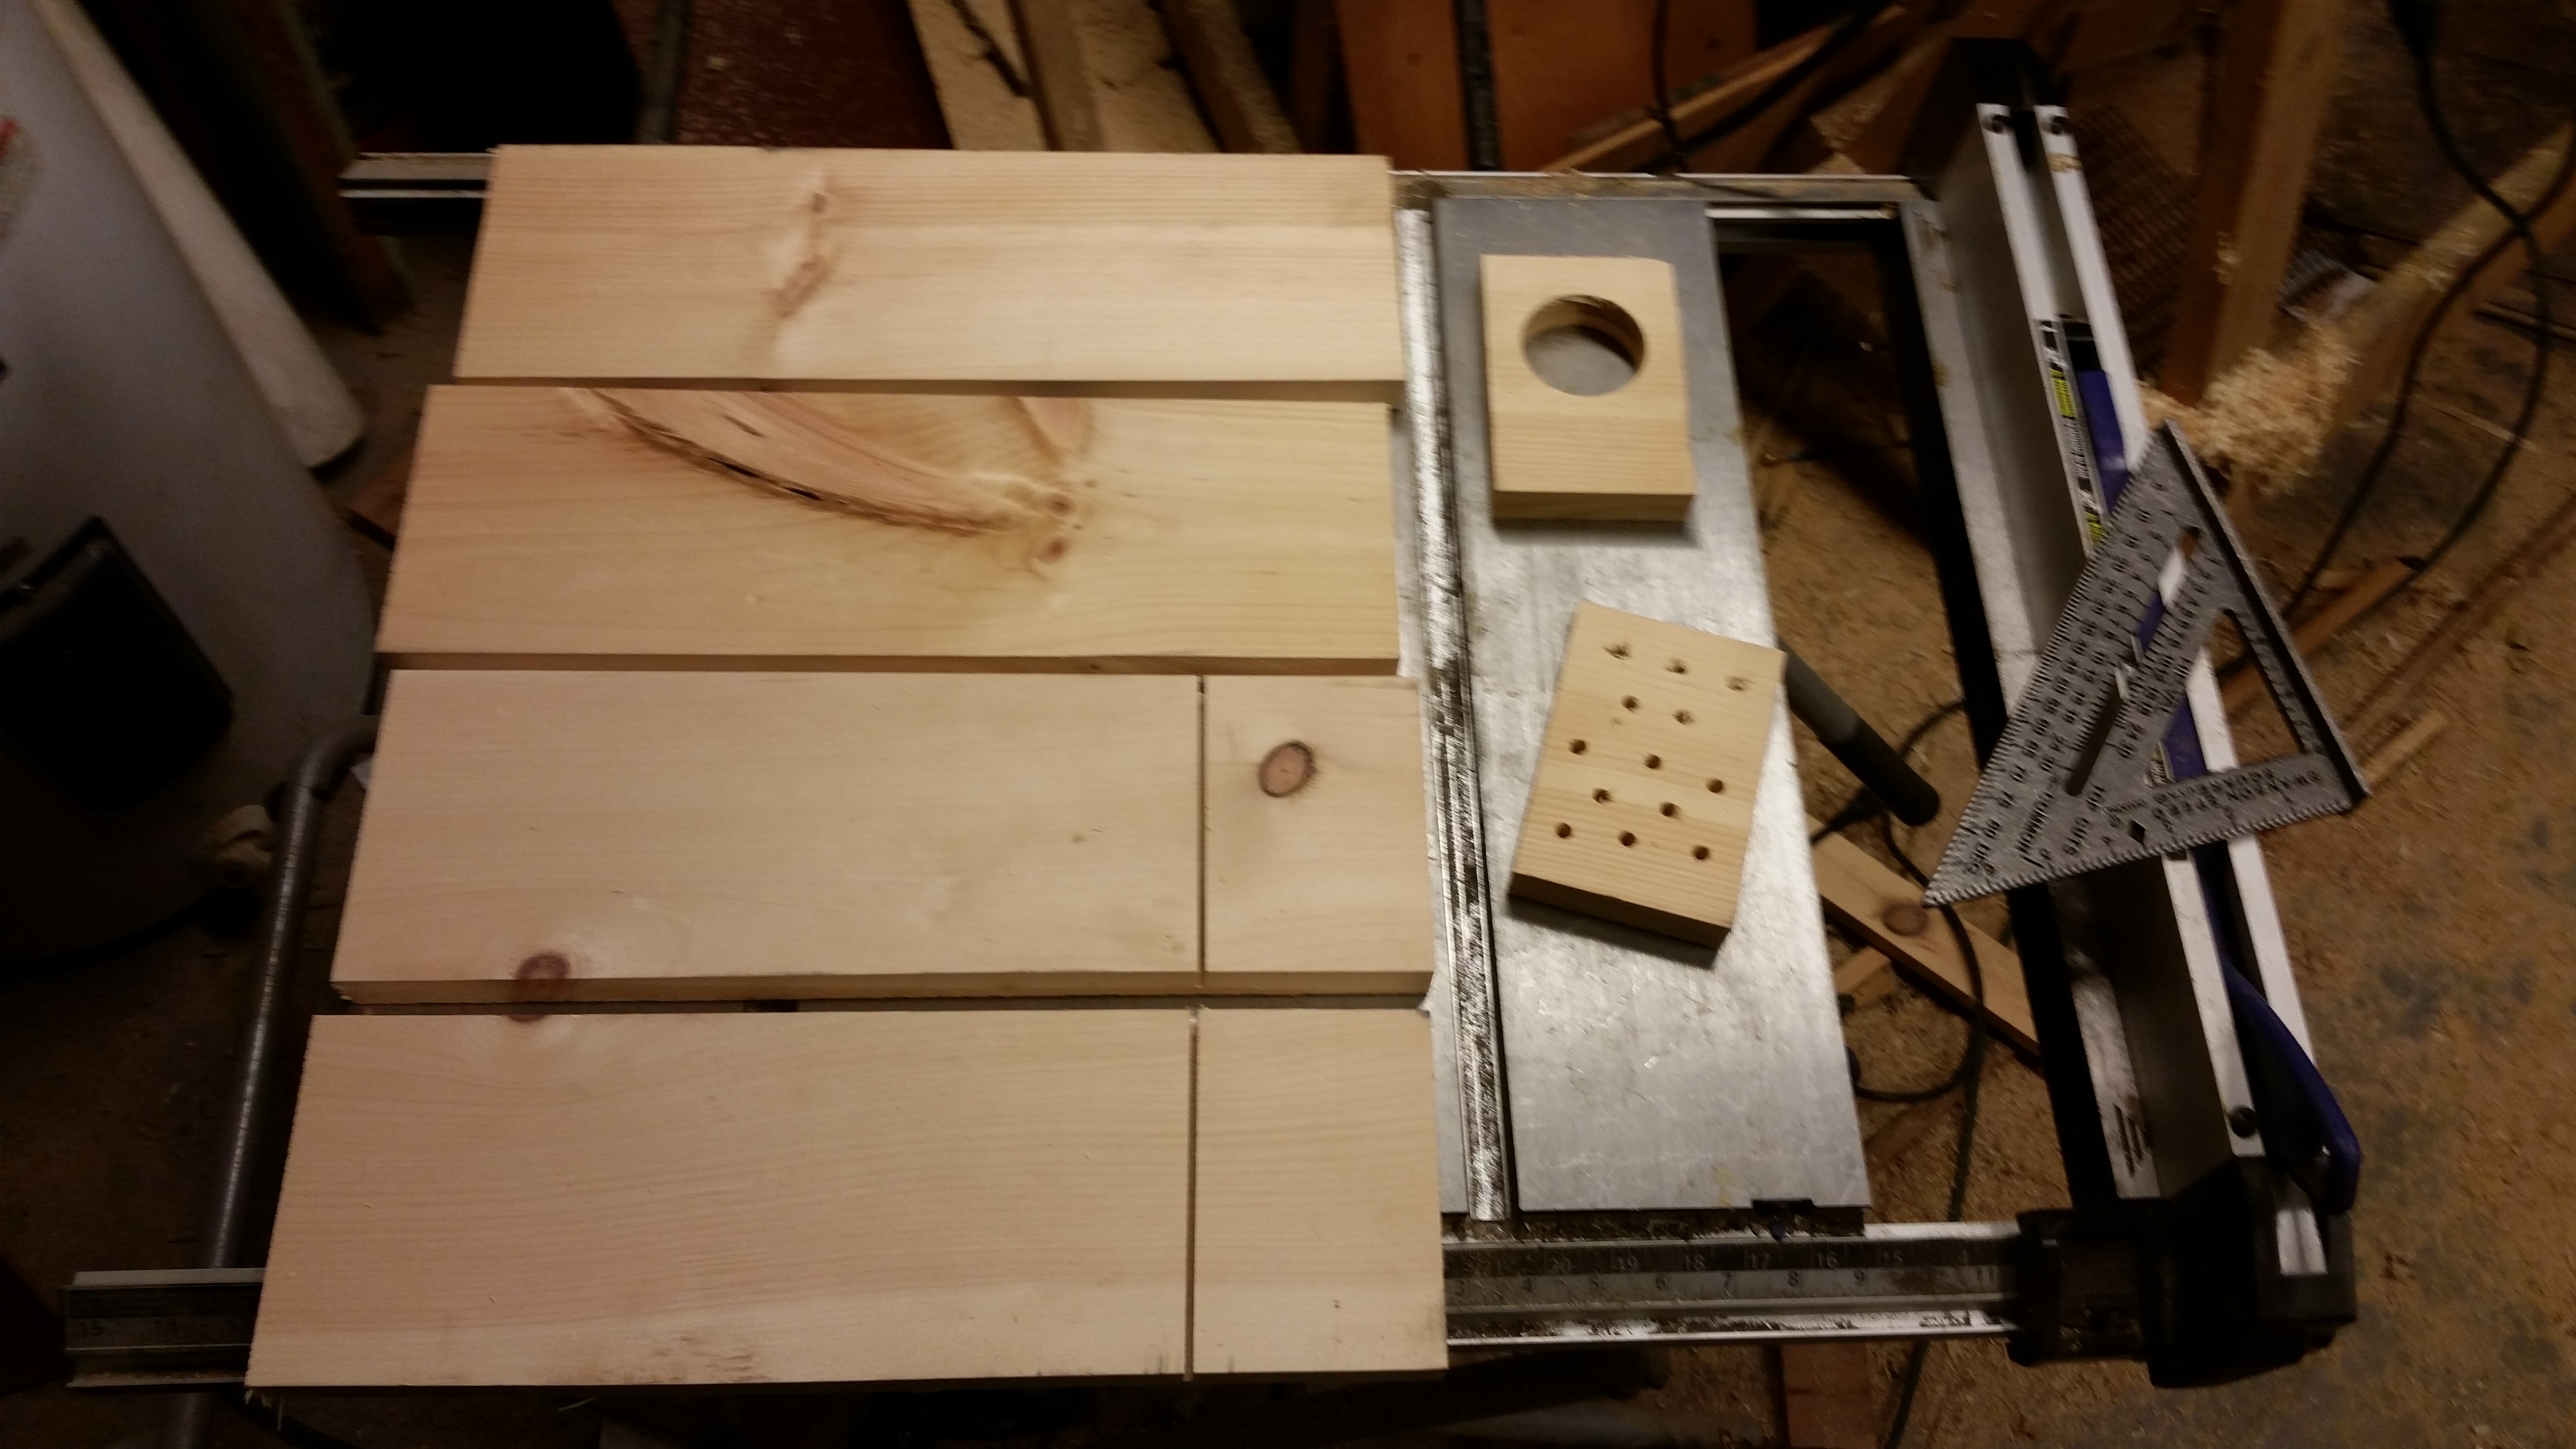
I had some “standard pine” scraps laying around from various construction projects. I love this stuff; it’s 7/8″ thick and 11-1/4″ wide, and it is cheap. The standard pine that I buy is planed on one side, and rough on the other. I opted to put the planed side facing inward, but only because I like the look of the rough-hewn stuff, and it makes it look more rugged and “farm-y”. Because I opted to use the Victor Power Kill Rat Trap, which is about 3-1/4″ wide, I decided the box itself would have an interior width of 3.5″ (the same width as a 2×4, which made a convenient jig to use while I was working out dimensions). I guesstimated an overall width of 5-1/4″, and a length of 16″ (most of my scraps were 16-19 inches long).
Using my table saw, because my miter saw is still in the garage and I didn’t feel like dragging it into the basement, I cut all my scraps to 16″ long. Quick and easy. I moved the fence to rip 5-1/4″ wide pieces, which meant I got two sides per piece of standard pine. Nice. I also ripped smaller scraps of standard pine into 5-1/4″ wide pieces for the front and back.
One more movement of the fence to 3-1/2″, and I cut the smaller bits of 5-1/4″ pine to measure 3-1/2″ wide by 5-1/4″ tall. In the back, I drilled sets of smaller holes, to help the smell of the bait waft through the air (I hope!), and I used a hole saw to drill a 2-1/4″ hole in the front piece.
A side note on the front hole: I’ve seen suggested measurements range from an inch to two inches, but the 2-1/2″ hole saw was the only one I could find in my less-than-organized shop.
And the last two cuts: I lowered the blade of my table saw to cut about halfway through the two side pieces to use to secure the “bars” to keep an extra wily weasel from just grabbing the bait and running off with it. I cut those slits at 3-1/2″ because that meant I didn’t have to move the fence again. Does it work well? No clue, yet.
Assembly time!
I used my brad nailer to attach the bottom to the sides, then the front and back pieces. I used a cheap 2″ hinge to secure the back of the lid, and a cheap eye hook latch to secure the front of the lid. The latch is supposed to help prevent coons from stealing the bait, although I have a feeling I’ll have to use something a little more complicated than a hook to keep out the coons.
That’s it for box assembly.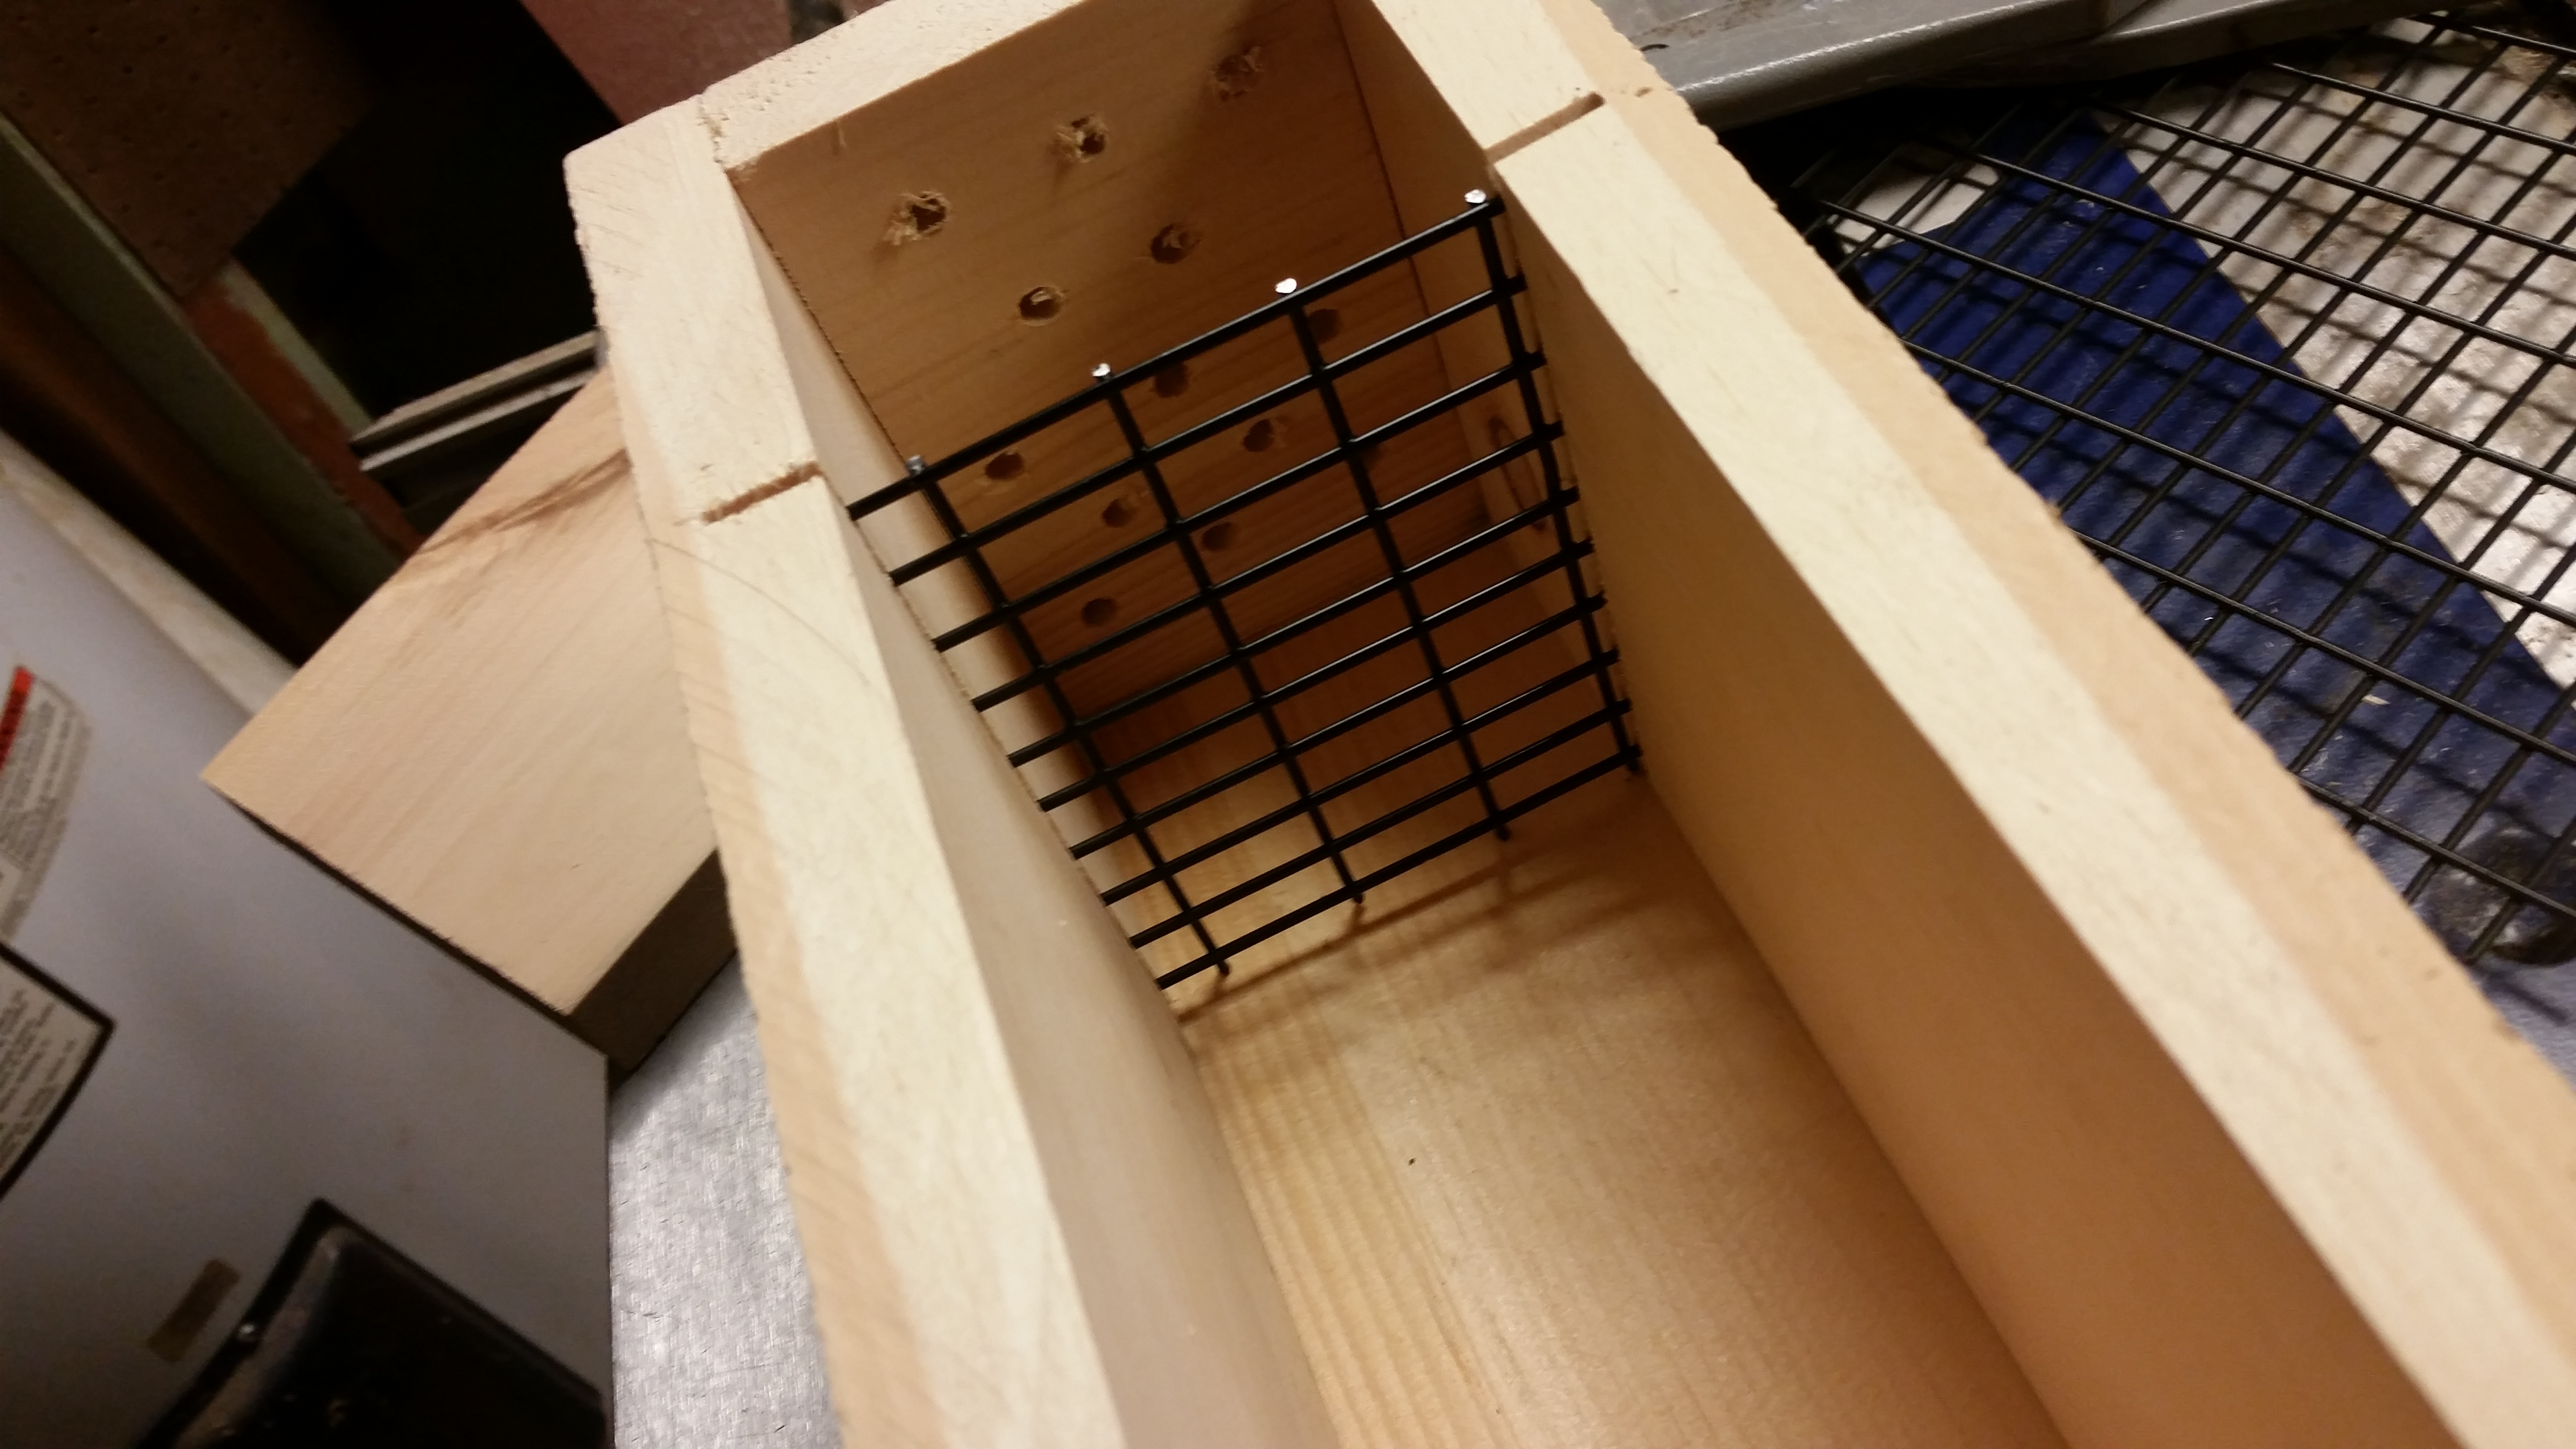
So what to use for “bars” or a “cage” to keep the bait safe (that sounds funny, I know). One of the first designs I saw, they had simply used a piece 1/2″ hardware cloth. While I have a couple full rolls of that in my basement (why, I have no idea), I also have a good number of 1″x1/2″ wire flooring scraps from rabbit cages that I turned into “nursery cages” with a dropped nest in the floor. I never throw anything away, and this time it worked out well. And yes, even with this design, I don’t see any reason that you couldn’t use 1/2″ hardware cloth.
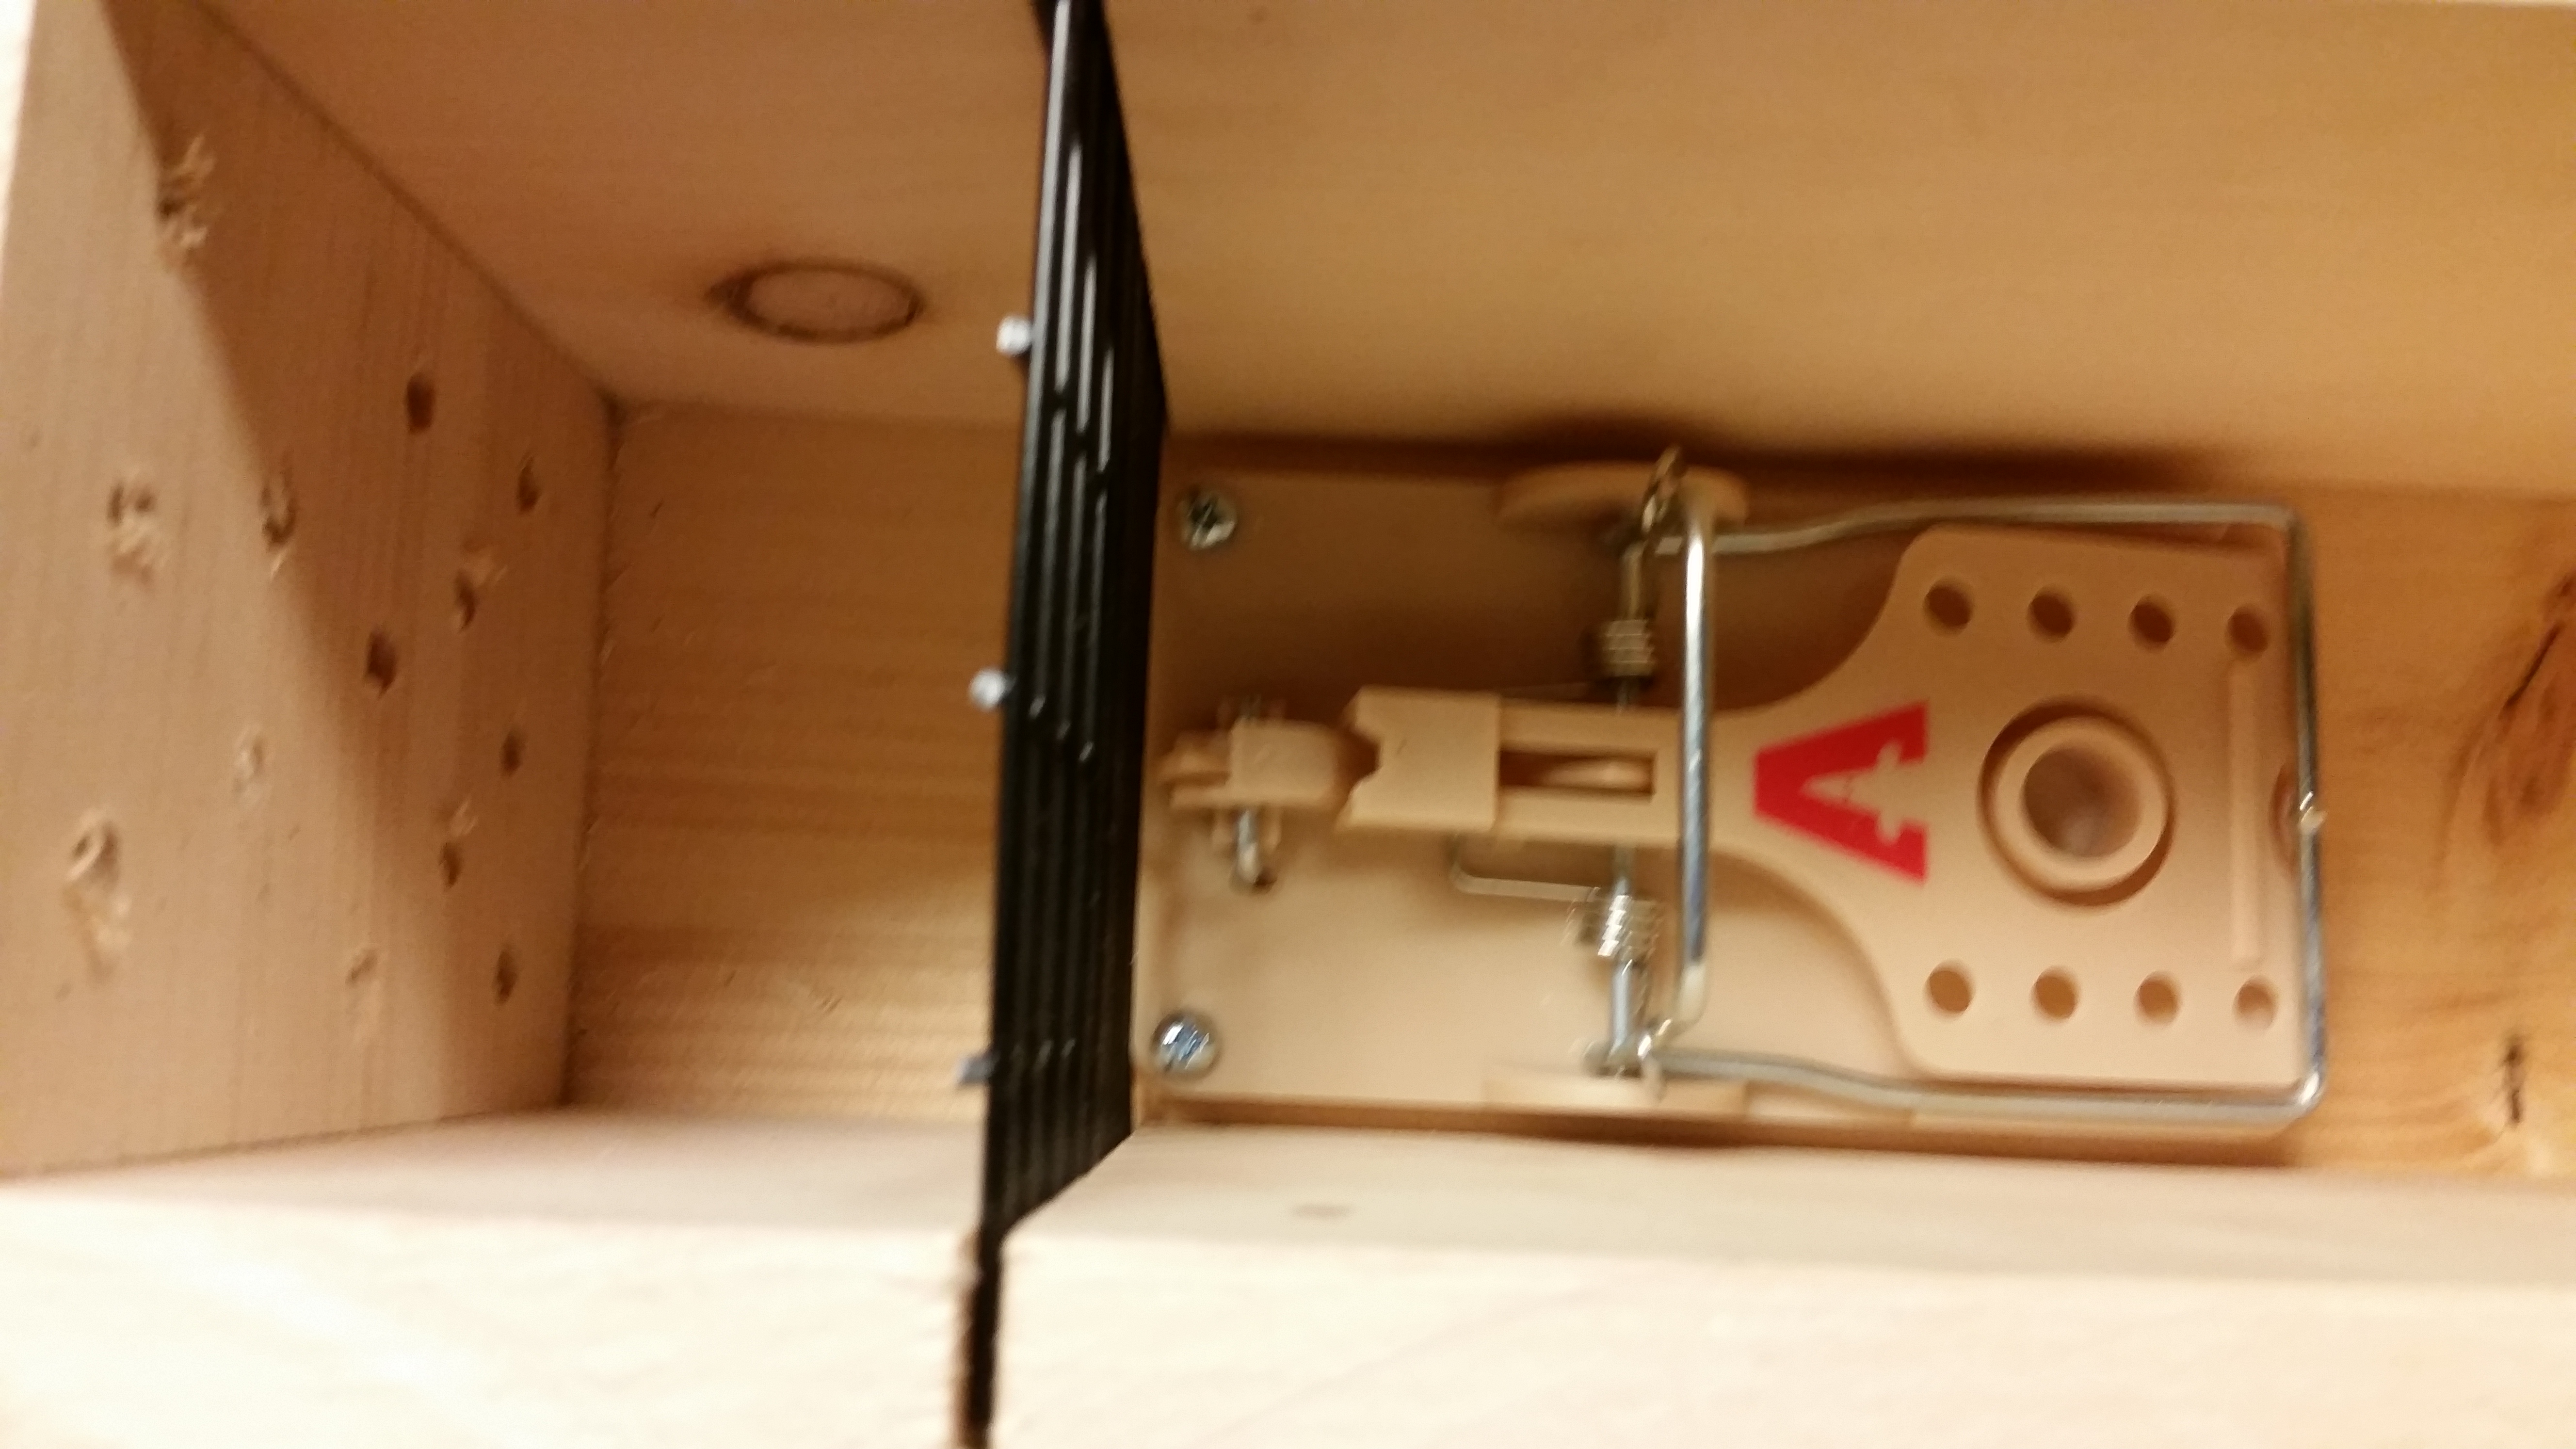 I measured and cut the pieces of cage flooring to fit, and slid it into the slots. I honestly think it looks completely badass, like a portcullis or something clunky and medieval. Once the cage is in place, I placed the rat trap against the cage, with the trigger pedal facing towards the front hole. One of the reasons I opted for the Victor Power Kill Rat Trap is due to the extra wide trigger pedal on it. I don’t think anything will be able to get to the cage (and the bait behind it) without stepping on the trigger, which springs at the lightest touch. I screwed the trap into place to perhaps avoid the “frozen dead weasel halfway out the door” issue.
For bait, I found some older “Manager’s Special!” baby beef liver at the IGA. I didn’t think to get a little dish or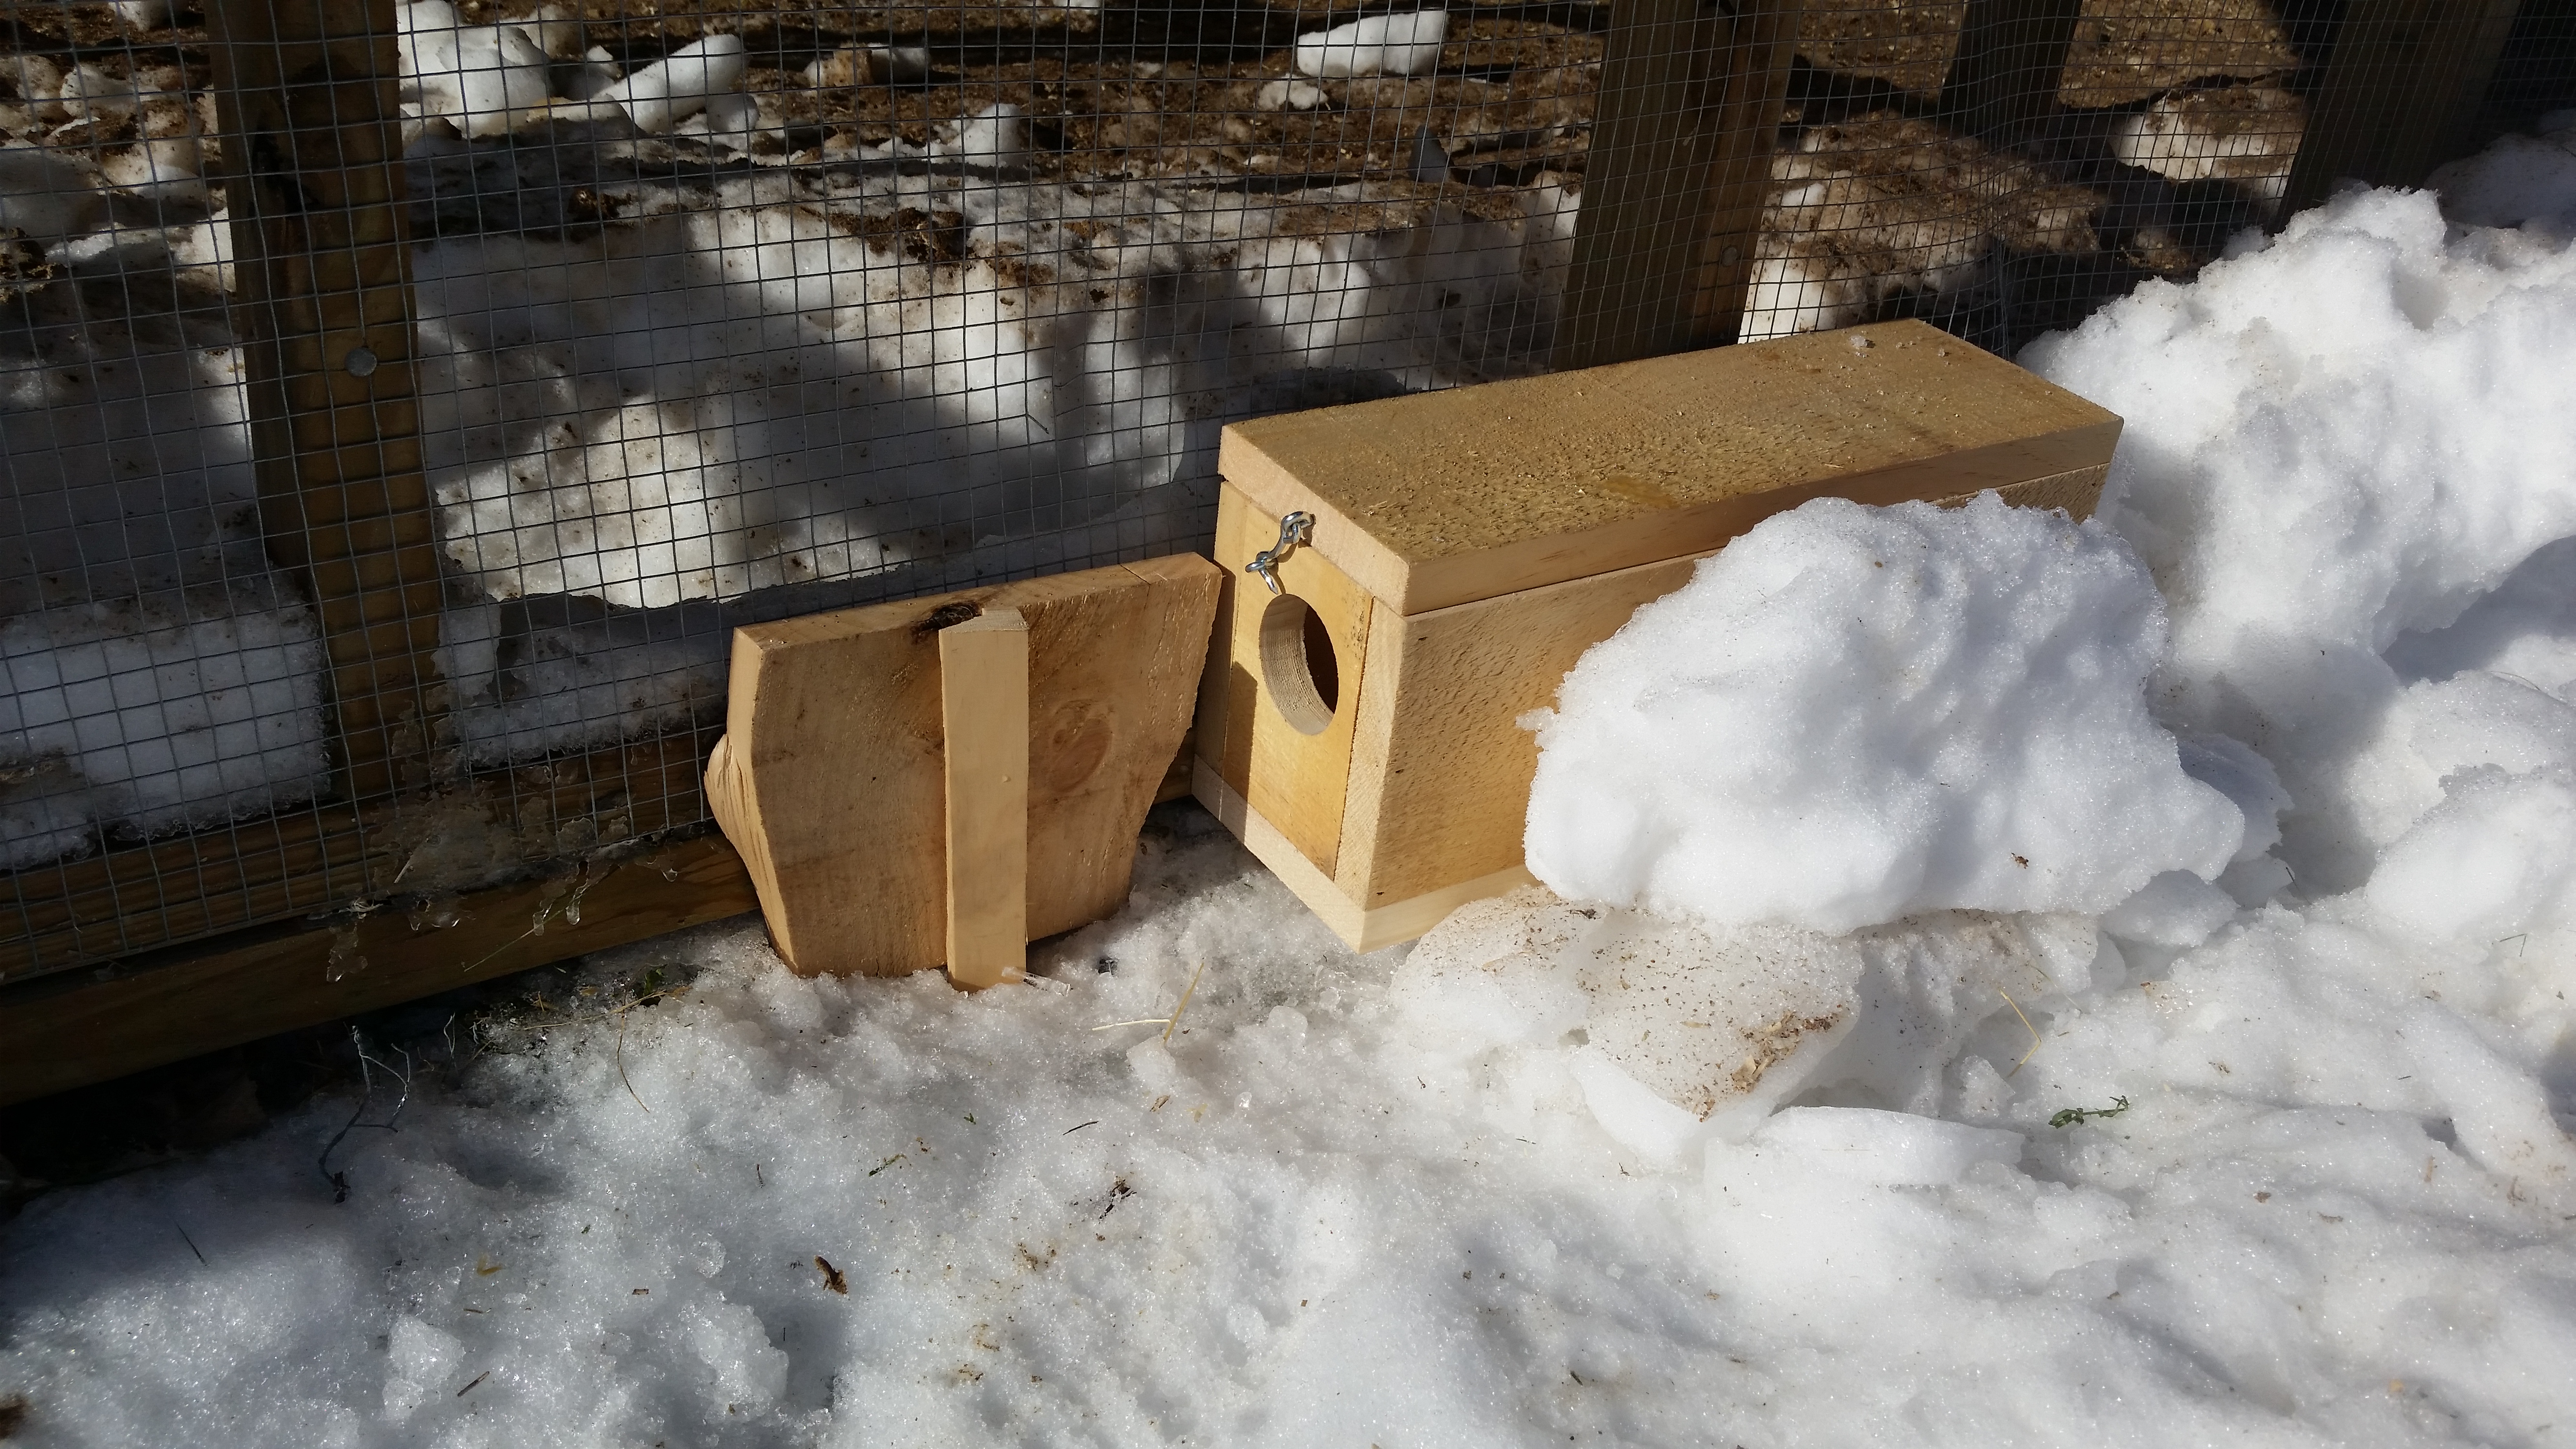 anything to put the bait into, so I just dropped it into the bait cage, set the trap, latch the lid, and placed the trap in what I hope is a good location: right next to where I suspect where the weasel(s) was making entry (which I’ve temporarily blocked off with scrap wood and a scrap wood stake). I packs some snow around the box to stabilize it a little more, and I will be very interested to see if there’s anything in the box, come tomorrow morning. The attacks had been coming every other day or so.
On a side note, I have a couple game cameras set up inside the run. One of the camera is facing the weasel box (although it won’t be able to see the entry, and the other camera is directly facing the temporary coop/run door, which I used some 1/2″ hardware cloth to try to protect the birds.
If one of those little weasily things comes a-calling, I should be rewarded in the morning with a frozen corpse, or, at the very least, photograph evidence of what’s been killing my flock.
Update
It turns out that Blu-Kote fixes weasel problems. If you want to know more, contact us. 🙂